


How To Make Ordinary Guitar Chords Sound Great
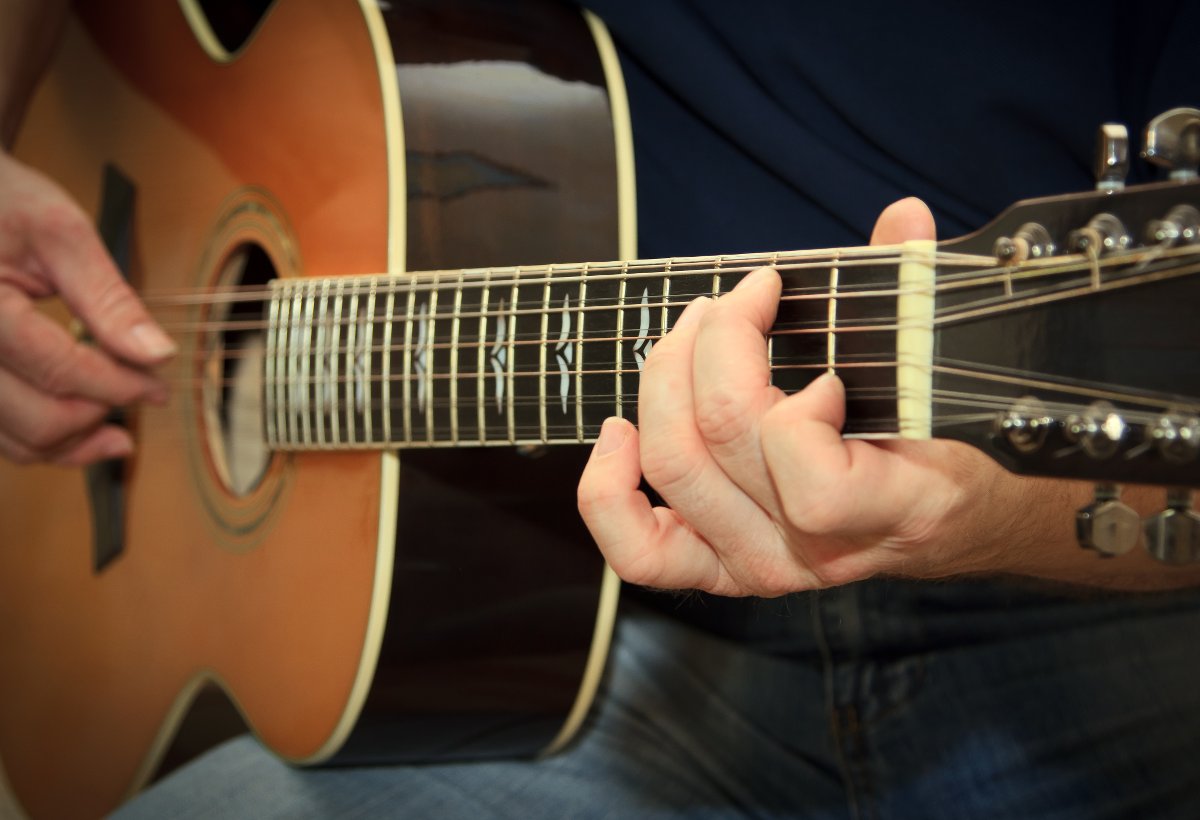
Picture yourself in this scenario: You’ve been learning guitar for a few months and you’re sitting in a room on a cold, bleak day holding a cheap acoustic guitar with old strings that are too high above the fretboard. It’s literally painful to play and the resulting sound is hardly inspiring. Hopefully it’s all “up” from here? It certainly can be!
In an ideal world, here’s what you can do:
- Invest in a good electronic tuner and make sure the guitar is well tuned. Tuners can be bought as a standalone device from music stores, or as a smartphone app. We recommend Cleartune, by BitCount (Android/iOS). Make it a priority to keep your guitar in tune and listen carefully to it. If a string sounds even slightly out of tune, question it and double check.
- Invest in a better instrument. Cheap guitars and older instruments have poor intonation and will not tune well, no matter how good you are. Understandably, it is not always easy for those on a budget, however even a reasonably affordable, brand new instrument will be a worthwhile upgrade, provided it is not bought from a bargain bin, second-hand, or as part of a cheap guitar package.
- If your strings are too high above the fretboard (this distance is called ‘action’) then consider having your instrument adjusted professionally at a guitar repair/servicing store. This will make the guitar much more comfortable to fret notes and play.
Upgrade Your Guitar Chords Technique!
Granted, practice is a big part of what learning the guitar is about. However, if you have been playing for a few years and are still not satisfied with the sounds you’re getting then make sure you’re observing the following:
- Make sure your fretting fingers are placed just behind the fret for each note of the chord.
- Place just enough pressure on the string to avoid buzzing. Too much pressure can cause the string to go slightly sharp and you’ll sound out of tune.
- Many guitarists make the mistake of not listening to every note of the chord. Play each note individually before strumming, to be sure they can be heard. The more you do this, the more your fretting hand will find the optimal position for each finger and you’ll build muscle-memory.
- Use a heavy pick. A heavier pick will encourage better technique, greater volume and fuller tone, since it gives more resistance against each string. This forces your strumming/ picking hand to use greater accuracy when strumming & picking. The thickness of the pick will allow for greater volume, while your tone will not sound thin or “plastic-y” as is common with light picks.
- Your strumming hand should use wrist-motion, not arm-motion. You’ll be able to play faster and gain greater control this way.
- Practice strumming the guitar quietly and loudly. When playing in general, strum moderately loud, so that you’re projecting well.
- Strum gently, but consistently. Smoothly brush the pick across the strings, but not too slowly. Avoid digging in and ‘crunching’ them together or creating so much movement that the strings vibrate against the fretboard. With practice, a gentle but consistent strumming motion can still generate decent volume, so don’t be concerned that it won’t be loud enough. This will ease tension on your muscles as well.
Guitar Chords to Try!
Let’s take a simple chord progression like this:

Here are a few ways to make this progression sound sweet to the ears. Use open guitar chords for this exercise.
- Bar 1 – strum the G chord, observing all that was said above in the Technique section. It should be sounding bright, loud and clear.
- Do the same for the Em chord. When you reach C, make sure you strum only the top 5 strings. It will sound much cleaner than strumming all six strings, as the bass note of the chord will be a C (the same as the chord name) rather than an E. To help you achieve this, place your third finger (which is currently on the lowest note of the C chord) in a position where it slightly mutes the bottom string. The edge of your fingertip need only touch the bottom string to do this.
- Lastly play the D7 chord on the top 4 strings only, using the same root-note principle as with the C chord. It would be possible to play the 5th string as well and still have a regular D7 chord, but because the lowest note is then an A instead of D, the chord is not as clean and defined. Practice strumming only the top 4 strings.
Where To From Here?
Contrary to what you might think, the open chords (within the first 5 frets) are some of the best sounding chords you will ever learn. The famous American guitarist Chet Atkins once joked, “Don’t play above the fifth fret… there’s no money there.” The open chords do have a particularly strong sound to them and are well suited to sustained rhythm playing and fingerpicking. Here are some more ways this progression can be brought to life:
- Using a pick, slowly and evenly play the lowest note of each chord (G, E, C and D respectively) followed by the top 3 strings, in the order of 3, 2, 1, 2, 3, repeated twice in each bar. For example, the first chord would be played as low G (6th string) followed by strings 3, 2, 1, 2, 3. Repeat that chord before moving to low E, followed by 3, 2, 1, 2, 3 etc. Make sure each note is loud and clear. It should create a nice arpeggio effect.
- Pick each note loud and clear and let them ring as long as you can before the next chord change. This can be used to add dramatic effect on ballads and fingerpicked music.
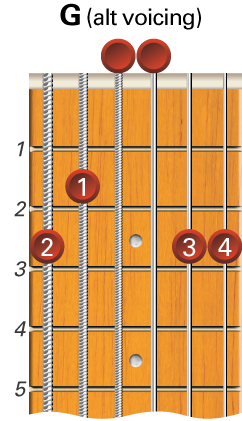
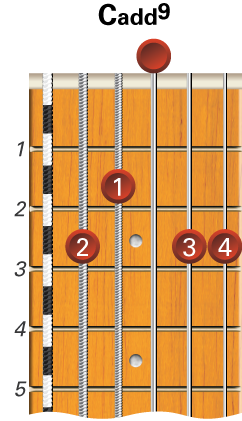
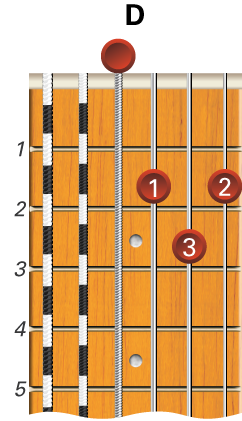
- Try different voicings of these chords, such as the ones suggested below. Over time you’ll learn more voicings and substitutions which can spice up a chord progression. Try the following, using the same picking pattern:


Who is LearnToPlayMusic.com
LearnToPlayMusic.com is the world’s leading music education innovator and publisher of print, eBooks, apps and online lessons.
– Continue learning with Learn To Play Music at LearnToPlayMusic.com


Good day, I read your blog once, then lost it. Took me forever to come back and find it. I wanted to observe what comments you got. Great blog by the way.
Nice tips and information about play guitar, chords and getting a good sound, It’s really good information for beginners like me.
Hello there, I often read your blog.I love it. Carry on the excellent work. Maybe you have contemplated blogging for money?
In this post you will learn how to make ordinary guitar chords sound great! Including proven tips & tricks, example exercises and guitar chord diagrams.
Good tips on chords , thanks, thought i’d leave you a genuine comment as opposed to the spammy ones above ^
Learning a guitar can be tricky if you don’t have the instrument most suitable for you.
I’m lefty and have been struggling with B7 chord for a long time. Any suggestions.
Hi Amanda, Go Lefties! Some of the greatest guitarists of all time have been left handed. Jimi Hendrix is probably the most famous. Having said this the B7 chord in the open position is difficult to master for both right and left hand players alike. The best advice we can give (apart from not giving up) is to practice changing to and from the B7 chord very slowly (preferably playing along with a metronome or drum machine) at least 1/day every day for a few weeks. Gradually speed up the changes as you can manage it without losing the beat. If you persist your brain and fingers will get there for sure and once you’ve nailed this chord shape there are not many others that you’ll then not be able to also play. Also check out the bar chord version of this chord – when you’re ready….
Thank you very much. I’ve found an app for my iPad and it is amazing! Solved lots of my problems.
Hey, it’s really an awesome article for beginners. I already using Cleartune App, it’s a good one and i see you also recommend this, that’s good.
Thanks for your article on guitar maintenance and care as always you hit on things that I don’t know or think about.Thanks for all the work you put into your articles.
Thanks for sharing the post. The way you narrated the post is good and understanding. After reading this post I learned a lot of new things guitar chords. Keep posting. Please let me know for the upcoming posts.
When I was a starter, I really struggled in getting good sound. Now looking at your guide, I wish I had seen it when I started.
I hereby thank you on the behalf of beginners
thank you for giving me wonderful information