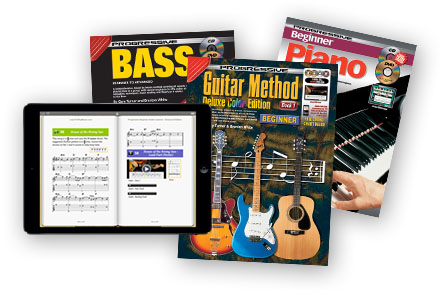

<< First < Previous | Intro 1 2 3 4 5 | Next > Last >>
Back to Table of Contents

The bass player, together with the drummer, form what is called the ‘rhythm section’ of a group. They create the backing beat, driving force and ‘tightness’ necessary for a successful group. Progressive Beginner Bass Lessons assumes you have no prior knowledge of music or playing the bass. In this book you will learn:
- How to read and play bass guitar music using standard music notation and also easy read TAB notation.
- Notes on all four strings including sharps (
 ‘s) and flats (
  ‘s).
‘s). - Scales, Riffs and Arpeggios so you can create your own bass lines.
After completing this book you will have a solid understanding of the bass guitar and will be ready for further study on specific styles of bass playing e.g., Rock, Blues, etc. All bass players should know all of the information contained in this book.
The best and fastest way to learn is to use this book in conjunction with.
- Buying sheet music and song books of your favorite recording artists and learning to play their songs.
- Practicing and playing with other musicians. You will be surprised how good a basic drums/bass/guitar combination can sound even when playing easy music.
- Learning by listening to your favorite recordings.
Particularly in the early stages it is helpful to have the guidance of an experienced teacher. This will also help you keep to a schedule and obtain weekly goals.
Using The Enhanced Features
This enhanced eBook contains video and audio recordings for all exercises. The book explains where to put your fingers and what techniques to use, while the video and audio lets you see and hear how each example should look and sound when played correctly.
Practice the examples on your own, playing slowly at first. Then try playing to a metronome set to a slow tempo until you can play the example evenly and without stopping. Gradually increase the tempo as you become more confident and then you can try playing along with the recordings.
To play along with the video and audio your instrument must be in tune with it (see Tuning Your Bass).
A purple bar with a play icon and an exercise number indicates a recorded example like this:
Each enhanced exercise includes:
Video
Watch a close up of the example being played by a professional teacher so you can check your technique and hear how the example should sound when played correctly.
Click the play icon (triangle) to start the video playing and then click the full screen icon (2 arrows) to expand the video to fill the screen. A band is performing with the teacher so you can hear how the exercise sounds when played together with other instruments. Drag the slider to watch different parts of the exercise again. Please note that the video is best viewed in landscape orientation.
Solo Track
Listen to the example played by itself so you can focus on the part you are learning. Click the play icon (triangle) to start the audio playing. Drag the slider to hear different parts of the exercise again.
Backing Track
When you are comfortable playing the exercise, use this audio to practice playing along with the backing band by yourself. Click the play icon (triangle) to start the audio playing. Drag the slider to hear different parts of the exercise again. Adjust the volume of your instrument and the recording so that you can hear yourself and the band at the same time.
Full Page Score

For longer examples, the music score for the exercise is available as a single image for easy viewing. Double-tap the image to open it full screen and then use your fingers to swipe up and down or zoom in and out. Please note that you can have the audio playing and the full page score open at the same time.
Approach to Practice
From the beginning you should set yourself a goal. Many people learn bass because of a desire to play like their favorite artist (e.g., Sting), or to play a certain style of music (e.g., Rock, Blues etc.). Motivations such as these will help you to persevere through the more difficult sections of work. As your playing develops it will be important to adjust and update your goals.
It is important to have a correct approach to practice. You will benefit more from several short practices (e.g., 15-30 minutes per day) than one or two long sessions per week. This is especially so in the early stages, because of the basic nature of the material being studied. In a practice session you should divide your time evenly between the study of new material and the revision of past work. It is a common mistake for semi-advanced students to practice only the pieces they can already play well. Although this is more enjoyable, it is not a very satisfactory method of practice. You should also try to correct mistakes and experiment with new ideas.
Strings
Different types of strings can be used to create different sounds and feels. Round wound strings are the most popular strings for modern bass playing. The gauge varies between light, medium and heavy. A standard medium gauge would probably be the best to start with e.g., G = 45, D = 60, A = 80, E = 105. The heavier or thicker the gauge the “bigger” the sound will be. The lighter the strings the easier and faster you can play.
Always clean your strings with a cloth after playing as this will keep the sound brighter. To get an optimal sound, and if you can afford it, change your strings several times a year, especially before an important session or recording.
Bass Guitars
The following diagram illustrates the various parts of the bass guitar.


Amplifiers
Bass guitars have pickups (a type of inbuilt microphone) and need to be plugged into an amplifier (amp) to be heard. There are two main types of amplifiers.

1. Combo – which has a combined amplifier and speaker cabinet.

2. Stack – which has a separate amplifier “head” and speaker box.
Electronic Tuner

Electronic Tuner
The easiest and most accurate way to tune your bass is by using an electronic tuner. An electronic tuner allows you to tune each string individually to the tuner, by indicating whether the notes are sharp (too high) or flat (too low). You can plug your bass directly into the tuner using the same lead that plugs into your amplifier.
There are several types of guitar/bass guitar tuners but most are relatively inexpensive and simple to operate. Tuning using other methods is difficult for a beginning bass player and it takes many months to master. So we recommend you purchase an electronic tuner, particularly if you do not have a music teacher or a friend who can tune it for you.
How to Read Music
There are two methods used to write bass music. First is the traditional music notation method (using music notes  ) and second is tablature. Both are used in this book but you need only use one of these methods. Most people find tablature easier to read, however, it is worthwhile learning to read traditional music notation as well. Nearly all sheet music you buy in a music store is written in traditional notation.
Tablature
Tablature is a method of indicating the position of notes on the fretboard. There are four “tab” lines, each representing one of the four strings of the bass.

When a number is placed on one of the lines, it indicates the fret location of a note, e.g.:

This indicates the 3rd fret of the second string (an F note).

This indicates the 7th fret of the 4th string (a B note).

This indicates the open third string (an A note)
The tablature, as used in this book, does not indicate the time values of the notes, only their position on the fretboard. You can read the time values by following the count written beneath the tablature, e.g.:

In this example, the first note is worth one count, the second and third notes are worth half a count each and the fourth note is worth two counts.
The small number in the count is used to indicate where a note is being held or where a rest occurs.
Note readers may need to refer to the tablature to determine the position of an example.
Music Notation
Music is written on a staff or stave, which consists of five parallel lines between which there are four spaces.

The Bass Clef

This symbol is called a bass clef. There is a bass clef at the beginning of every line of bass music
The Bass Staff

A staff with a bass clef written on it is called a bass staff.
Bar lines are drawn across the staff, which divides the music into sections called bars or measures. A double bar line signifies the end of an important section of music, while a final bar line is written at the end of a piece.

Music Notes
There are only seven letters used for notes in music. They are:

These notes are known as the musical alphabet.
Bass music notes are written in the spaces and on the lines of the bass staff.
Notes and Rest Values

The Quarter Note

This music note is called a quarter note. A quarter note lasts for one beat.
The lines and spaces on the staff are named as such:

Extra notes can be added by the use of short lines, called ledger lines, e.g.:

When a note is placed on the staff its head indicates its position, e.g.:

This is a B note.

This is an E note.
When the note head is below the middle staff line, the stem points upward and when the head is above the middle line the stem points downward. A note placed on the middle line (D) can have its stem pointing either up or down.
Notes on the Lines and Spaces


The Four Four Time Signature
At the beginning of each piece of music after the bass clef, is the time signature. The time signature indicates the number of beats per bar (the top number) and the type of note receiving one beat (the bottom number).
The Four Four Time signature


These two numbers are called the four four time signature. They are placed after the bass clef. The  time signature tells you there are four beats in each bar. There are four quarter notes in one bar of music in time.
Playing Position
For a comfortable playing position, it is best to use a strap. A wide strap, approx. 2-3 inches (8-10cm) is best, so the weight of the bass is evenly distributed. Adjust the strap to a length that is comfortable. The full weight of the bass should be resting on the shoulder strap.
The bass should be angled slightly upwards (see photo), so that your left arm is free to move while you play.
Whether you prefer to sit or stand while you play, make sure that the position of your bass (strap length and angle) is the same so that your playing won’t be affected. Keep the bass close to your body so that it is easy to reach all parts of it when you play.
1. Standing Position

2. Sitting Position

Sit on a stool with a footrest to raise your right leg or just cross your right leg over your left leg.
The Right Hand
To play the notes on the bass you can either:
- Use the fingers of your right hand to play the strings or,
- Use a pick (which is a piece of plastic shaped like a triangle held in the right hand) to play the strings.
Most bass players use the right hand fingers to play the strings. Some Rock bass players prefer using a pick because it gives a crisper sound.
1. Using Your Fingers

The fingers of the right hand are named as shown in the following diagram. Use the ‘m’ and ‘i’ fingers to play the strings.

The thumb (T) is used to support your right hand by resting it on the bass pickup as shown in the photograph. Most modern bass guitars have two pickups. One close to the fretboard and a second one nearer the bridge. In the early stages of playing, it may be easier to place your thumb on the front pickup as the string tension is not quite as “hard” as on the back pickup. The tone will also sound fuller and heavier, and it will also be easier for your right hand fingers to play the strings.
You should also experiment by playing with your thumb resting on the back pickup as the sound is clearer and has more attack and “bite”.
The Rest Stroke
When playing notes with your fingers, the rest stroke is used. The rest stroke involves the finger playing the string and then coming to rest on the next string. The photos below illustrate the movement of the index finger when playing the rest stroke.

Play the 3rd string with an upward motion (not an outward motion).

Come to rest on the 4th string.
Alternate between your index (i) and middle (m) fingers, making sure that one of the two fingers is always resting on a string while the other is playing a string.
Always use this alternating finger style as it will give you more possibilities when changing between notes and strings.
2. Using The Pick

Picks are usually made of plastic and come in a variety of different shapes and thicknesses. Most bass players prefer a medium or thick gauge pick, as thin picks tend to give a less defined sound.

Use the tip of the pick to play the string.

The pick is held between the thumb and index finger. Many bass players use this picking grip.
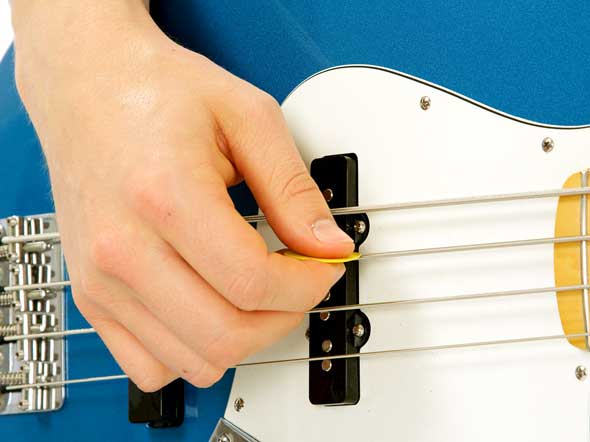
When playing with the pick, move your hand from the wrist (do not move your arm). You can support your right hand by placing the palm on the bass guitar body or use your other right hand fingers to rest on the body. Use a downward pick motion, indicated  .
.
The Left Hand
Left Hand Placement
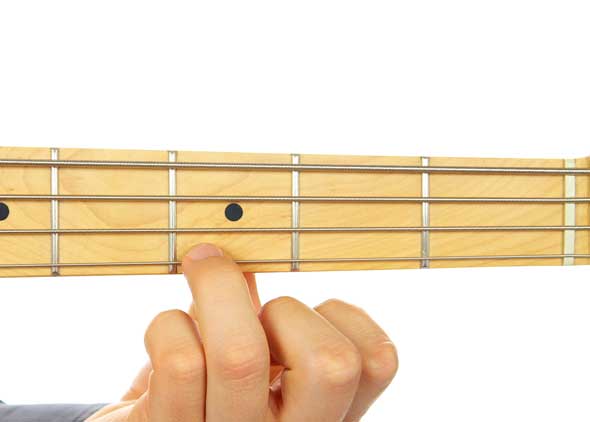
Your fingers should be on their tips and placed just behind the frets (not on top of them).

For greater support, the left hand thumb should be placed behind the neck of the bass, approximately opposite your index and middle fingers as shown in the photo below.
The left hand fingers are numbered as shown in the following photograph. The left hand finger number, if needed, is written next to the music note.

<< First < Previous | Intro 1 2 3 4 5 | Next > Last >>
Back to Table of Contents